Math
155B – Topics in Computer Graphics – Spring 2020
Project #2 – Random dithering – Grayscale and Color – In Fragment Shader
Overview: For this assignment, you will implement Random Dithering in a fragment shader. See the final page below for sample images. Goals: Gain more familiarity with shader programming. Learn how to use randomization in a shader program. Learn how noise and randomization can help or hurt image quality. Experiment with dithering sRGB space versus linear RGB space.
Due date: Friday, April 24, 9:00pm. (revised date!) Upload to gradescope, upload all source files to the shared google drive folder, and get graded via zoom.
Download a sample executable, and starter code from:
http://www.math.ucsd.edu/~sbuss/CourseWeb/Math155B_2020Spring/Project_2/Dithering_Spring2020.zip
Your program should support the following major features:
· Dithering to k discretization levels, controlled by up/down arrows.
· Dithering in grayscale mode or independently dithering each color component.
· Using random dithering to set color probabilistically, or just mapping each color to the closest discetization level. (The latter is not dithering.)
· When using random dithering, either dither directly with the levels in the texture map, or convert from sRGB to linear RGB to determine the randomization.
· These should render similar to the images below, or as demo’ed online
Suggested steps for completing the project.
1. Download, as starter code from the URL given above.
2. This contains a set of some core source files. DitherColor_Base.cpp and DitherColor_Base.glsl. Download in addition, from the textbook’s web page of software: GlShaderMgr.[cpp,h] and RgbUImage. Put all these files into a single Visual Studio project.
3. When you compile and run the file, you will find following functions:
a. SPACE toggles between showing the original image and another image.
b. Up/down arrows make the “other” image be either a grayscale version, an inverted color image, or a image of random noise. This is controlled by a value “ditherLevels”, taken modulo 3. We will call this “other” image, the “dithered image”, but in the base code, no dithering is done.
4. Learn about dithering
from the pre-precorded lecture, or by googling for “random dithering” or
looking at the Wikipedia page for the topic “Dither”, the subsection on “Digital
photography and image processing” (not the part on audio dithering). Also note
the interesting, short section at the start of the Wikipedia page about the
etymology of the work “dither”.
IN SHORT: For dithering to k levels, there are k permitted color
values, equally spaced from 0 to 1. Namely, the k levels are 0, 1/(k-1),
2/(k-1), …, 1. We will work primarily with very small values for k such
as 2, 3, 4, 5 for instance. Dither is a technique that lets a small number of
colors do a decent job of representing a large number of colors.
5. The code is fairly similar to GammaCorrectTest, available from the text book’s software web page. That program did a regular dither pattern, not a randomized dither pattern.
6. Your project will update this for the following functionality:
a. The program reads a texture map from the file “DitherImage.bmp”. This code is already implemented for you.
b. The program can toggle between “randomization mode” and “non-randomization mode”. In non-randomization mode, dithering consists of mapping the pixel color to the closest discretization level. In randomization mode, dithering stochastically decides which of the two closest discretization levels to use as the pixel color.
c. Gray scale mode: In gray scale mode, colors are converted to gray, and discretization is done on gray scale value.
d. Optional conversion from sRGB to RGB mode. The default mode is to perform the discretization on the values from the texture map. The alternative is to assume the texture map colors have been encoded as sRGB values, then convert values to linear RGB for determining the probability of mapping up to the next higher discretization level, or down to the next lower discretization level. When the image is an sRGB image, this should give better results.
e. The suggestion is to use “R”, “G” and “L” keystroke commands to toggle each of these three modes. (“R” = random; “G” = grayscale; “L” = linear-RGB.) The program already has code to accept up/down arrow keystrokes to update the number of dither levels.
f. Try this with the supplied DitherImage.bmp texture. Also, find an interesting image to download (or take a picture with your camera), to test the program with in addition.
7. Your programming changes include:
a. Add variables to the fragment shader code to control the three modes. (The ditherLevel variable is already present.) These will be declared a uniform variables, either bool or int.
b. Add code the C++ code to take keystrokes for “R”, “G” and “L” and update these uniform values. This already done in the C++ code for ditherLevels. Use similar code for the other controls, including glUniformi() and glGetUniformLocation().
c. Change the fragment shader to render in these different modes. This is main part of your coding.
d. The fragment shader already has code for random number generation. You may just re-use this. Note that fragment shaders cannot actually use a random number generator; they have to make their own. Indeed, they have to run deterministically. In the supplied code, this is based on the gl_FragCoord values for the coordinates of the current pixel.
8. The supplied downloaded .zip file (URL above) has two image. The first “DitherImage.bmp” is a color image of me (Sam) holding a leek. The second is grayscale image of Michelangelo’s David that is often used for dithering experiments.
9. Download or create a third image for your tests too.
10. For your third image, do your dithered images look better in with conversion to linear RGB or without? In the former case, it means your image is sRGB-encoded. In the latter case, it means your image is in linear-RGB space. Note this might not be at all clear cut. It depends to a great deal on how your monitor is tuned, and on how the image was created. How would you qualitatively describe the difference in the images obtained with using or not using conversion to linear RGB?
11. Experiment with different numbers of dither levels. How few levels can be used to have the image look decent? Setting ditherLevels equal 2 or 3 is probably not enough, but a surprisingly small number of levels can give very good image quality.
12. Notice the grainness in some of the image below. This is a typical appearance for noise in an image.
13. Please consult with Sam Buss or Jon Pham or fellow students on piazza for clarifications. Posting images to piazza, or posting theoretical discussion to piazza, or even small code snippets, is highly recommended.
14.
Hand in procedure:
FIRST: Upload a PDF with a couple dithering images to gradescope that illustrate some attractive or informative output your program, for instance of your third image. Optionally describe any interesting aspects of your project, or describe aspects you found to be hard. AND include in the PDF file a statement of “Acknowledgement of Assistance”. If you worked completely on your own, your Acknowledgement of Assistance can state this.
SECOND: Share your C++ and GLSL shader code with Sam Buss and Jon Pham in a folder named “Project2” in your google drive folder. For this, upload ALL necessary source code and GLSL into this folder so we can easily run your code. This will let us help with debugging or also allow us to run your program for grading.
Grading: Grading is in a zoom session with Jon Pham or Professor Buss. We will schedule times for zoom sessions. Before this, you must have uploaded your code so we can run it on our own computers.
SEE BELOW FOR SAMPLE IMAGES
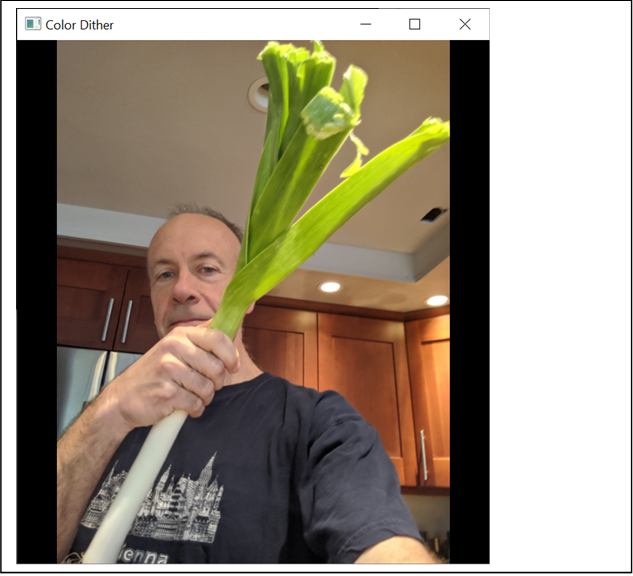
Sam with a leek: Original Image.
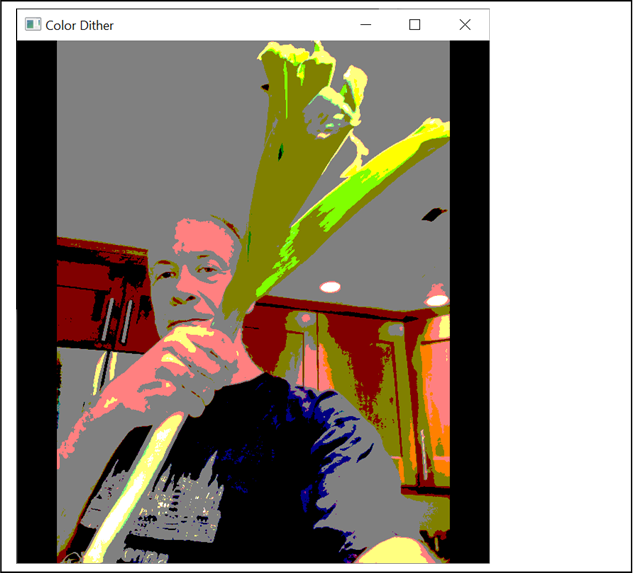
Sam with a leek: Dither Levels = 3. No Randomization. (Snaps to closest
level.)
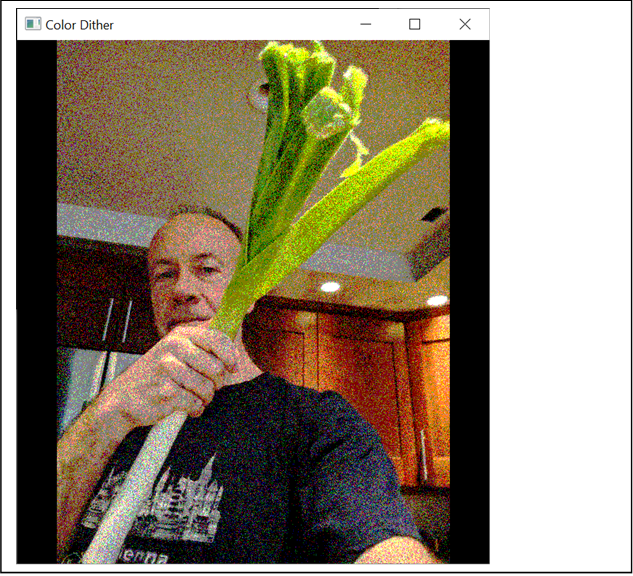
Sam with a leek: Dither Levels = 3. Dithering on original texture values.

Sam with a leek: Dithering based on conversion to linear RGB values. (Looks
similar in the web page, but is actually rather different.)
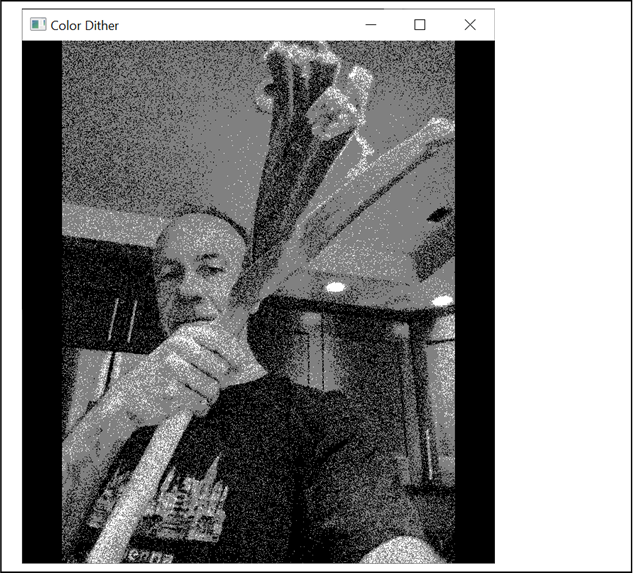
Sam with a leek: Grayscale, Dither levels = 3, Dithering based on conversion
to linear RGB values.