Math
155B – Topics in Computer Graphics – Spring 2020
Project #1 – Shader-based double sine-wave water surface
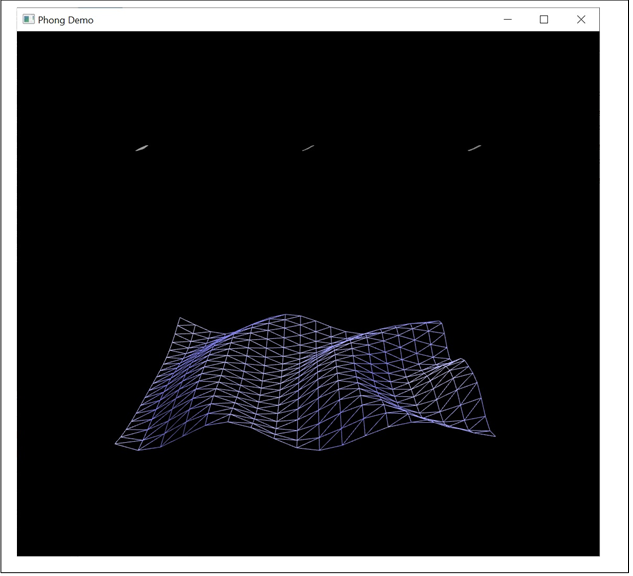
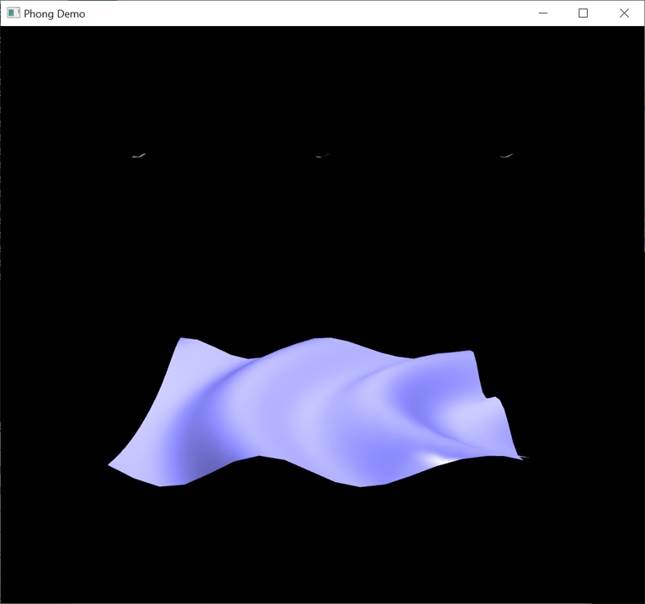
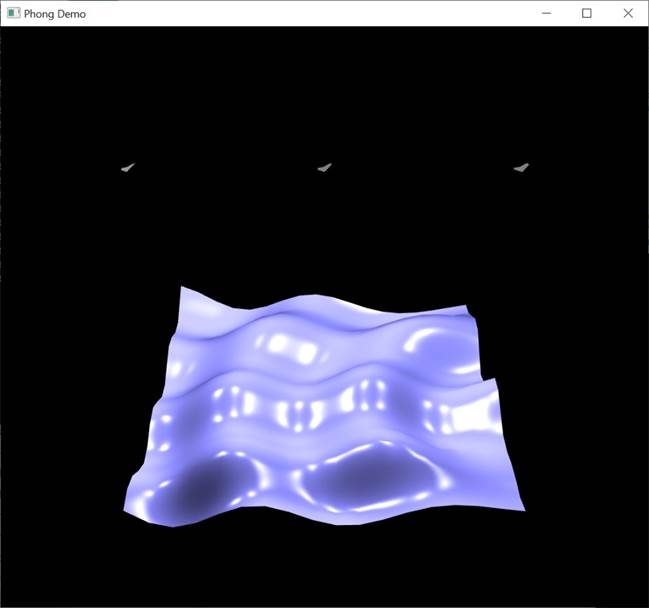
Overview: For this assignment, you will write a program that uses shaders to generate water waves, calculating both the water height and the surface normals in shaders. See the final page below for sample images.
Due date: Monday, April 13, 9:00pm. Upload to gradescope, and get graded via zoom.
Download a sample executable, and starter code from:
http://www.math.ucsd.edu/~sbuss/CourseWeb/Math155B_2020Spring/Project_1/GlslWaves_Spring2020.zip
Your program should support the following major features:
· In the first mode, your program will display with one sine wave, with normal, and Phong lighting.
· In the second mode, your program will render the combination of two sine wave curves, superimposed.
· You will modify the Phong lighting vertex shader to set the positions of the vertices.
· You will modify the Phong lighting fragment shader to set the normal vectors to the surface. (This is not Gouraud shading or Phong shading. Instead, since we have mathematical formulas for the sine waves, your fragment shader code calculates the exact normal vector.)
· These should render similar to the images below, or as demo’ed online
Suggested steps for completing the project.
1.
Download, as starter code, the files from (same link is above)
http://www.math.ucsd.edu/~sbuss/CourseWeb/Math155B_2020Spring/Project_1/GlslWaves_Spring2020.zip
2. This contains a set of some core source files. GlslWaves.[cpp,h], WaterPlane.[cpp,h], and WavePhongData.[cpp,h]. Download in addition, from the textbook’s web page of software: EduPhong.[cpp,h] and EduPhong.glsl, GlShaderMgr.[cpp,h], LinearR3.[cpp,h], LinearR4.[cpp,h], MathMisc.h, and GlGeomSphere.[cpp,h] and GlGeomBase.[cpp,h]. Put all these files into a single Visual Studio project.
3. When you compile and run the file, you will find it renders a re-meshable flat ground plane (the water surface), and some Phong lights, and Phong materials. (This is a stripped down version of projects from last quarter.) For this, make sure the .glsl file is in the current directory (usually, the one with your C++ project files).
4. This has the same keyboard controls as last quarter. (Re)familiarize yourself with them: they are listed in the stdout window.
5. Your project will add waves to this ground plane by programming a vertex shader and a fragment shader.
6. Look through the code to see what is present:
a. GlslWaves.cpp – Main program. You will make very minor changes to this file for your project.
b. WaterPlane.cpp – Defines the ground plane (water surface) with all points at height y=0.
c. DemoPhongData.cpp – Definitions of Phong materials and lights’ properties
d. EduPhong.cpp – Reads the Phong lighting shader code from the .glsl file. Also handles loading material properties and light properties into the shaders.
e. GlShaderMgr.cpp – Code to facilitate reading shader source code from a file. Used by EduPhong.cpp.
f. GlGeomSphere – Renders spheres. (Used to show position of lights.)
g. LinearR4, etc. Linear algebra and math routines.
h. EduPhong.glsl – the “EduPhong” shaders doing the Phong lighting. The core of Project 1 involves modifying these shaders.
7. Side comment: The remaining steps may be confusing at times. PLEASE: if the instructions are unclear, or you are stuck, post questions to piazza. (And, if you know the answer to a piazza question, please answer it!).
8. Initial steps to get the .glsl file (shader source) ready to modify.
a. Start a new .glsl file. Create copies (with new names please!) of the “PhongPhong” versions of the vertex shader and fragment shader from EduPhong.glsl. These are the programs named “vertexShader_PhongPhong” and “fragmentShader_PhongPhong”. Put them in the new file.
b. Change GlslWaves.cpp to read both EduPhong.glsl and your new .GLSL file, and to compile using the new copies of the shaders (which you will be modifying). Alternatively, you can copy all the Phong lighting shader code from EduPhong.glsl into your new .GLSL file, and then you need to have only the shader programs from your new .GLSL file.
c. Make sure everything still works.
9. Your first shader program. For this part, you will modify the vertex shader, but keep the fragment shader unchanged. The modified vertex shader will move the vertices up and down to create the wave shapes. Modify the vertex shader to do the following:
a. Add a new uniform input named curTime, of type float. This can be done right after the lines declaring projectionMatrix and modelviewMatrix.
b. Similarly add a new integer uniform variable waveMode. The intent is that if it zero, one sine wave is generated. If it is one, then two are generated.
c. Examine the GlslWaves.cpp code. Check how it determines and use the locations of the projectionMatrix and modelviewMatrix are used. Similar code already tracks and sets the curTime and the waveMode values. Values are set with glUniform* commands. Please understand how all this works.
d. Change the vertex shader, so that when it receives a vertex at position vertPos, it modifies the y coordinate to be the appropriate height for the sine wave(s). (See math formulas below.) Keep the x and z coordinates the same. I suggest making the point where waves are centered lie somewhere outside the ground plane. Ultimately, the waves should look as good as in the demo (or better!), but at the moment the normals are all just (0,1,0), so specular highlights are not working well.
e. The glsl code will not let you modify the input variable vertPos, so you may wish to make another vec3 variable and copy vertPos to it. Let mvPos4 and gl_Position and mvPos be computed with the new y height.
f. Test that everything works well before proceeding further. You should see the surface with travelling sine waves if you render in wireframe mode. Adjust the frequency and wavelength, and the center of the wave generator. The positions of vertices should be good, lights should work etc. However, the normals are not correct yet, so specular highlights will not work.
g. The “B” command should toggle between rendering a single wave or two superimposed waves.
h. Congratulations, you are through the first major part of the project.
i. Adjust (in the C++ code) the colors of lights and the material properties of the water plane to get something that looks somewhat like water. Don’t put too much effort into this part: it does not seem that Phong lighting by itself can make a decent looking water surface.
j. Look at how lighting responds to changes in mesh resolution.
k. Congratulations you are done with the first shader! Consider posting a screen image your program’s output at this point to piazza for feedback on whether it looks good.
10. Now work on the second shader program. You will modify the vertex shader to send x,z values to the fragment shader. You will modify the fragment shader to compute the normal before doing Phong lighting calculations. In more detail:
a. You will borrow a fair amount of code that you wrote for the first shader. But now, the normal calculation is done at each pixel by the fragment shader. This will require knowing the x and z coordinates of the point in local coordinates (not modelview coordinates): these need to be output from the vertex shader (use a new “out” variable or variables), and received in averaged form as “in” variable(s) by the fragment shader.
b. Calculate the mvNormalFront with a mathematically correct formula in the fragment shader. (It is no longer an “out” / “in” variable for the shaders.
11. Math formulas. Fix values for (a)
wavelength (lambda), frequency (freq), and amplitude (amp). (b) a center point
c where waves emanate. These can be hardwired into the shader programs,
but make them separate variables in the shader programs so they are easy to
modify. Let d be the distance from the center. Then the wave height is
given by
height = amp * cos( 2*pi*( d / lambda – freq*t ) ).
The speed of the wave will be lambda*freq. (Google “travelling wave formula”
for other discussions of this; they do not always use the same variable
conventions!) You should understand why this works as the formula for a
travelling wave.
When there are two waves, you just add the two heights to get the height of the
combined waves.
Calculating the normal vector: Do this similar to the method used
last quarter for the surface of rotation project. I suggest finding the
derivative with respect to d, and then using (-d.x,1,-d.z) where d.x and d.z
represent x and z components of d appropriately rotated relative to the
direction from the center of the waves. (This can get discussed in a class
meeting online.)
When there are two waves, you find the partial derivatives by adding the
partial derivatives of the two surfaces (since the wave heights combine
linearly). Once you have the two partial derivatives, take the cross product to
get a vector normal to the surface.
12. Hints:
a. The fragment shader must compute the normal in modelview coordinates (not affected by the projection matrix). Don’t forget to use the inverse transpose matrix for transforming normals. This is needed since the Phong lighting calculation works in (orthogonal) modelview coordinates.
b. The fragment shader will need to know the original vertPos values in order to compute the normals. (See 10.a. above.)
c. There will be duplicate code in the two shaders. You can either write the code twice and make sure it the same in both shaders, or you can write a new function. (The former is probably easier.)
13. You will see the light spheres are affected by the shader program (waving as flat pieces). You could fix this by using yet another shader to render the spheres, but it is not required for this project.
Hand in procedure: FIRST: You will receive instructions for how to share your C++ and GLSL shader code with Sam Buss and Jon Pham. When you are done, please make sure all necessary source code and GLSL is uploaded so we can run your code. This will let us help with debugging or also allow us to run your program for grading. SECOND: Upload to gradescope a PDF file, showing two screenshots of your program’s execution, optionally describe any particular things that worked well or were difficult with your project, AND include a statement of “Acknowledgement of Assistance”. If you worked completely on your own, your Acknowledgement of Assistance can state this.
Grading: Grading is an individual session with Jon Pham or Professor Buss. We will schedule times for zoom sessions. Before this, you must have uploaded your code so we can run it on our own computers.
SEE BELOW FOR SAMPLE IMAGES